Guide
User Instructions
Support
The Life of the Buddha website presents two types of materials: (1) the narrative mural panels that appear in the image window, initially at the left; and (2) the various texts associated with the murals, initially at the right. The latter include the literary narrative titled Sun of Faith (in English and Tibetan), the Painting Manual (in English and Tibetan), the mural inscriptions (in English and Tibetan), and citations to the story’s sources in the Tibetan canonical literature.
The website likewise provides two ways to approach these materials. You can begin by selecting a text, such as a chapter from the Sun of Faith, which will highlight the relevant part of the mural in the center of the image window. The mural will then “follow along” as you read and click through the text. You can also begin by exploring the mural, panning and zooming the image window, and clicking links in the pop-up windows that appear as the cursor moves across the window.
You can open multiple text windows simultaneously, such as the English and Tibetan versions of the Sun of Faith, and rearrange them in various configurations.
Getting Started
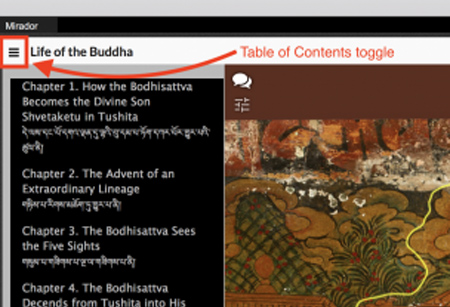
The easiest way to begin reading the Life of the Buddha is to select a chapter from the Table of Contents on the left. You can then close the ToC tray and begin reading the text. Click on the first line of text you want to read. Then navigate down/up by using the arrow keys on your keypad. As you move through the text, the associated part of the mural will appear in the center of the image window.
How to Navigate the Texts
The Life of the Buddha project includes three different texts: (1) the literary narrative of the Buddha’s life story titled the Sun of Faith; (2) the Painting Manual, which gives instructions on how to visually depict the literary narrative; and (3) the inscriptions included on the mural surface. All three are available in both the original Tibetan and English translation.
The Sun of Faith is divided into chapters, and each chapter is further divided into smaller scenes. In the text, these are marked by black bars (for chapters) and gray bars (for scenes), with corresponding numbers. Chapters and scenes are also outlined on the mural.
The simplest way to navigate the Sun of Faith is to select a chapter from the Table of Contents window at the left. Clicking a chapter opens a text window at the right with the Sun of Faith and the corresponding part of the mural in the image window.
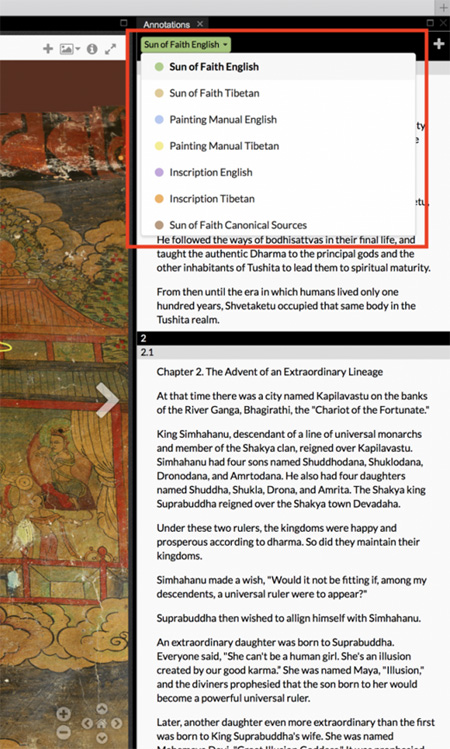
You can select the desired text and language from the dropdown menu at the top of the text window.
How to Navigate the Images
Mural images appear in the image window, initially at the left side of the screen.
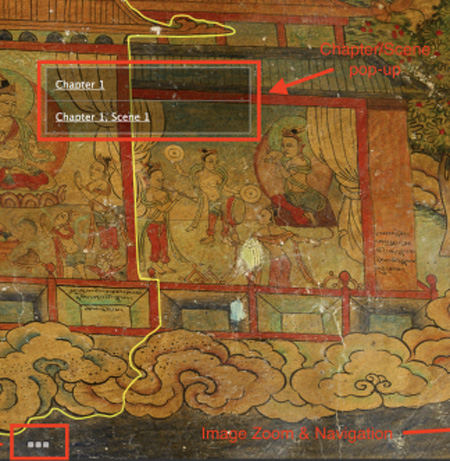
You can zoom and pan across the mural image in several ways. Zoom in and out of the mural image by clicking the “+” and “–” buttons at the lower right corner of the image window. Double clicking on the image will zoom in. The scroll feature of your mouse will also zoom in and out.
Pan across, up, and down an image by clicking the arrow keys at the lower right corner of the image window. Clicking the home button at the center returns the image to its original size. Clicking and dragging the cursor over the image will also pan in any direction.
You can select a different mural panel from the “canvas list” at the bottom of the image window. The canvas list can be open and closed by clicking the “…” icon at the bottom of the image window. Once the gallery is open, you can select the desired mural panel.
Moving the cursor over the mural image will highlight the associated chapter or scene and open a pop-up window. You can find related texts by clicking on the link(s) in the pop-up window. The associated text will appear in a window to the right of the image.
You can lighten the images by clicking the image adjustment icon (three sliders) at the upper left of the image window. Click the sun icon and move the slider up or down as needed.
Adding, Removing, Resizing a Text or Image Window
To add a text window, click the “plus” (+) symbol at the upper right hand corner of any currently visible text window.
To remove a text window, click the “x” next to the word “annotations”, located to the upper right of any text window.
To resize a text window, place the cursor between windows until a double-arrow appears; drag to resize.
To move a text window, click the “Annotations” tab at the top and drag to the desired locations. Text windows may be placed on left/right side or the top/bottom of the screen, in any combination. To combine multiple windows together as tabs within a single frame, drag the “Annotations” tab of one window to the tab bar of any other window.
Viewing in Full-Screen Mode
To view the image window in full-screen mode, click the double-arrow icon in the upper right corner of the image window. Click the icon again to return to normal view mode.
Image Manipulation
To change how the image is displayed, toggle the “image annotations” symbol (three horizontal faders) in the upper left of the image box to reveal eight display options: Rotate right; Rotate left; Brightness; Contrast; Saturation; Grayscale; Invert colors; Reset
Search Functionality
It is possible to search for key terms such as proper names, places, and other text strings. Enter a term into the search box in the upper right header and press return/enter. This will result in a list of all instances in which the term appears, across all texts, together with thumbnails of the associated image. It is then possible to filter results by text source, panel, chapter, or scene.